Note: This post discusses the project I’m doing currently. Check it on kHarshit/image-captioner. The working demo is available on https://imagecaptioner.herokuapp.com.
Overview
Recurrent Neural Networks (RNN) are used for varied number of applications including machine translation. The Encoder-Decoder architecture is utilized for such settings where a varied-length input sequence is mapped to the varied-length output sequence. The same network can also be used for image captioning.
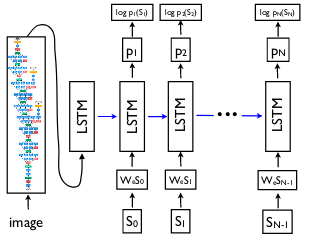
In image captioning, the core idea is to use CNN as encoder and a normal RNN as decoder. This application uses the architecture proposed by Show and Tell: A Neural Image Caption Generator.
Here’s an excerpt from the paper:
Here, we propose to follow this elegant recipe, replacing the encoder RNN by a deep convolution neural network (CNN). Over the last few years it has been convincingly shown that CNNs can produce a rich representation of the input image by embedding it to a fixed-length vector, such that this representation can be used for a variety of vision tasks. Hence, it is natural to use a CNN as an image “encoder”, by first pre-training it for an image classification task and using the last hidden layer as an input to the RNN decoder that generates sentences. We call this model the Neural Image Caption, or NIC.
Implementation
This image-captioner application is developed using PyTorch and Django. All the code related to model implementation is in the pytorch directory.
- Dataset used: MS-COCO dataset
- Vocabulary: The vocabulary consists of mapping between words and indices.
- Encoder: The ResNet101 model pretrained on Imagenet is used as encoder.
- Decoder: The LSTM (Long-Short Term Memory) network is used as decoder. We’ll give the decoder RNN a special
<start>token to indicate the start of the sentence and<end>token to indicate end of sequence. In addition to taking two weight matrices i.e. the input at the current time-step and the hidden state at the previous time-step thus combining those to get next hidden states, we need to add image information i.e. third weight matrix. Then, we sample the vocabulary at every time-step.
Running locally
- Cone the repo
$ git clone https://github.com/kHarshit/image-captioner.git
$ cd image-captioner-
(Optional) Create virtual environment either through conda or virtualenv
-
Install the dependencies
$ pip install -r requirements.txt- Run server
$ python manage.py runserverYour app should now be running on localhost:8000.
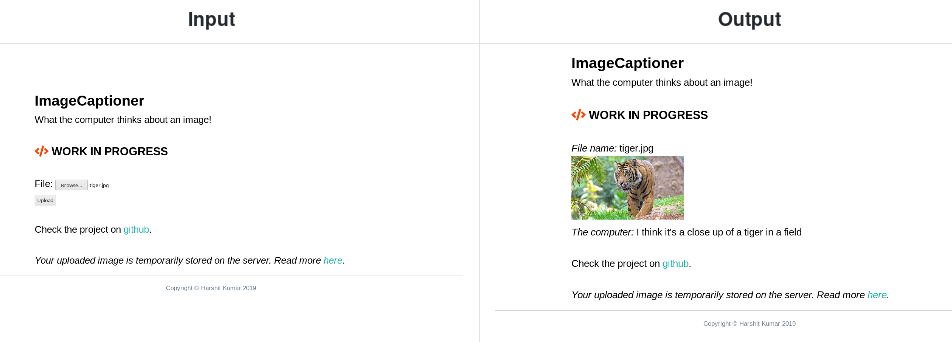
Image captioning with Attention
The problem with encoder-decoder approach is that all the input information needs to be compressed in a fixed length context vector. It makes it difficult for the network to cope up with large amount of input information (e.g. in text, large sentences) and produce good results with only that context vector. With attention mechanism, the encoder CNN instead of producing a single context vector to summarize the input image, produces a grid of vectors. In addition to sampling the vocabulary, it also produces a distribution over the locations in the image where the model looks while training thus focusing the attention at one part of image. The idea is described in Show, Attend and Tell: Neural Image Caption Generation with Visual Attention .

Comments